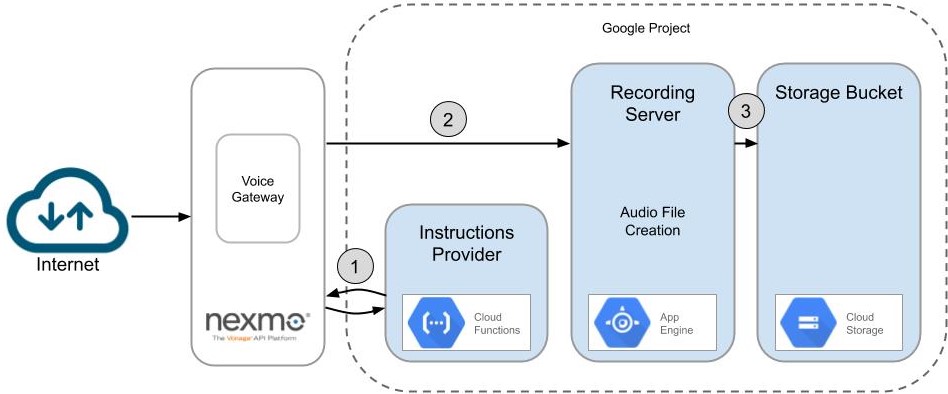
Nexmo Voice Application
Creating a Nexmo application is not complicated, as there is not much to configure: you have to provide a phone number and two webhook URLs: one to return a Nexmo Call Control Object (NCCO) containing instructions and one to receive event data. Similarly, using your Nexmo app is simple:
- A call comes in through your application.
- The application asks for instructions at the provided web address.
- The application executes the instructions.
This last step is when the call actually starts. Throughout this process, the Nexmo application sends event messages to the webhook containing information on the current state of the call.
To implement the new websocket feature only means giving the NCCO instruction to connect via websocket with your web server’s address.

Providing Instructions with Google Cloud Functions (GCF)
GCF is a platform on which we can deploy a simple Express application to be used as a function which is called via HTTP. Its resources are small and its runtime mustn’t be long. We can easily answer Nexmo’s request with the call instructions thanks to GCF. On this platform, we can deploy a simple Node.js Express app with the sole purpose of providing an instruction set by returning a JSON object to each request. Two instructions fulfill our needs:
- Instruct the caller to leave a message.
- Connect the call to the specified web address via a websocket.
To instruct Nexmo on how to proceed, we must answer its request with a JSON object listing all the steps. The object must be in NCCO format. In our example, this gives:

The field content-type specifies the audio format to be in linear PCM at 16000 Hz.
Recording Server on Google App Engine (GAE)
Now for the more challenging part. Since Google Cloud Functions have a short execution time limit (around 5 seconds), it can’t be used to hold a connection for the length of a whole conversation. This is where GAE comes in! Applications can be deployed on this platform with the possibility of holding a connection for longer periods of time.
To create a websocket application in Node.js, one could rely on librairies like Socket.IO or, as we did, use a combination of packages consisting of ws, express-ws and websocket-stream. With these, for every connection, a duplex stream object is created and can be piped anywhere. Our next step is to create an audio file from it.
As specified in the NCCO, the audio data is in PCM format with a sample rate of 16000 Hz. This is valid WAV audio. Using the wav package, we can first wrap the PCM stream into a WAV container and then pipe the stream into a file writer, specify the audio format, define the output path and the job is done!

Saving files to Google Cloud Storage
In GAE we can only use temporary folders for writing and reading files. This means that another resource is needed in order to store these audio files permanently. Using the Google Cloud Storage API, we are able to store files in the project’s storage space. And guess what? Uploading files via the API is as simple as following the example already laid for us in Google’s documentation.

With this, we have our full recording server. A simple call will end up creating audio recordings in a Google Cloud Storage bucket in WAV format. Having successfully come up with a solution to stream audio from a live call to a web server, we can now think of any number of possible applications such as voicebots, transcribing caller speech in real-time, sentiment analysis or even passive voice biometrics. These can even be used in combination with the recording server. Voice interfaces such as this may be used everywhere in the future. The next step for this technology is to be used as one of the easiest ways of processing audio from a phone call into any kind of applications.

